Growing mushrooms at home is a fun and rewarding adventure for the whole family. Everyone from Dad to the kids will enjoy watching these mushrooms pin and quickly grow into the tastiest mushrooms you’ve ever had.
These mushrooms will, under the right growing conditions, produce multiple flushes of mushrooms every few weeks. Slowly, over time the mycelium will use up all of the nutrients within the compost. Once the nutrients are depleted from the compost the production of fruiting bodies will pretty much stop.
This is when your bag of mushrooms becomes Spent mushroom substrate a great compost to add into your garden, flowerbeds, and compost pile. There are many uses for spent mushroom substrate, some of which were talked about in a previous blog
What follows below are the instructions that will come with the kit it’s a great resource to read before you even shop for a kit. We want to make sure when you get a kit for yourself or as a gift, that everyone knows what to expect and under what conditions these Agaricus bisporus mushroom kits will perform the best.
Instructions for Agaricus bisporus mushroom kit
This mushroom kit requires no direct sunlight. Artificial light or indirect sunlight do not harm the kit.
Because each home environment is different, the stages of growth may take longer than described in these guidelines.
Please read completely before you begin.
Your fresh mushroom growing kit contains two bags:
- The large bag is pasteurized mushroom compost with a pure culture of mushroom mycelium growing in it.
- The small bag contains ‘casing soil’, a mixture of sphagnum peat moss, water, and crushed limestone. It is in this layer that the mushrooms actually form.
To start the growing process:
- Wash your hands before you begin. Remove the small bag (casing soil), leave the large bag in the box. Open the large bag, rolling the sides of the bag down in the box.
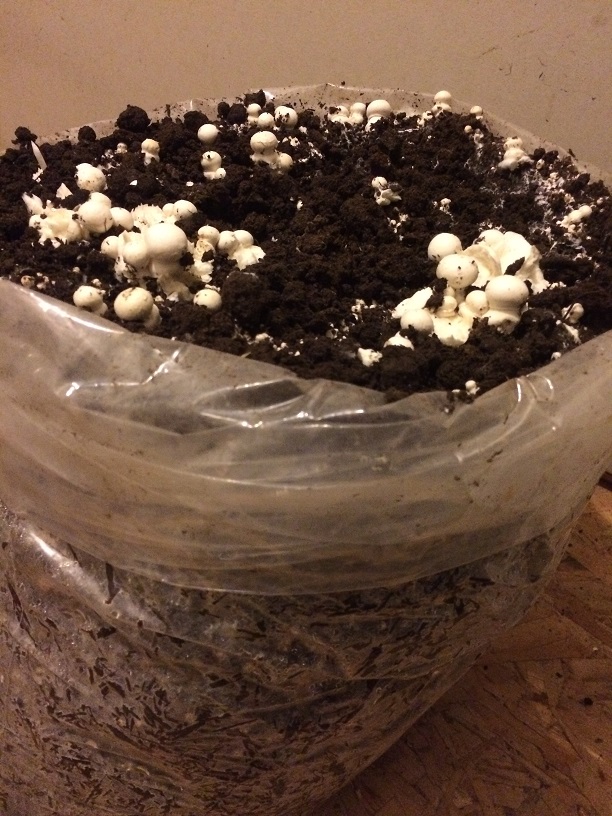
If you look closely, you can see the white threadlike growth, called mycelium. You may notice the smell of mushrooms when you open the large bag. Level and tamp the surface of the compost, do not attempt to break up or split up this large bag.
Pour the casing soil onto the level surface of the compost. Gently level, but do not compress the soil. Even depth across the entire surface. Loosely close the large bag, leaving a slight opening for moisture to vent, and set the kit in a warm (70-76 degree area). Cooler temperatures will slow the growth process
- The mycelium begins to grow into the casing soil. After 5-6 days check for growing mycelium (white threadlike growth) at the surface. If no growth is visible, wait for 1 to 2 days, check again; it may take up to 14-21 days depending on the environment.
When the mycelium is visible on 30-40% of the surface you can open the bag completely, either rolling down the sides or cutting an inch above the soil. Move the kit to a cooler area (62-65 degrees). Avoid placing in a drafty area. Opening the bag and moving the kit to a cooler location stimulates the mushrooms to form.
It will take a minimum of 16 days, usually somewhat longer depending on the temperature, for the first mushrooms to appear. At 65 degrees air temperature, 20 days for mushrooms to appear is normal.---- Record the date you open the bag here_______.
Watering:
Watering is best accomplished with a paper cup with a number of holes poked in the bottom. 4-6 oz per watering is all the soil can absorb at one time. The goal in watering is to maintain the moisture level of the casing soil at the same level as the day you applied it.
The frequency of watering depends on your environment. Dry environments will require more water. Ideally, the kit will require water every 2-3 days. If you find the kit is always dry, you may need to find a less dry environment, or cover the entire box with a towel that is kept moist.
Check the moisture by pinching the soil to see how much water is present when you first set the kit up, and maintain that level of moisture. Overwatering is detrimental to the growth pattern.
Growth:
The mycelium forms into tiny mushroom pinheads, visible 6-8 days after opening, with some pinheads beginning to enlarge into mushrooms. As the mushrooms develop, the cap and the stem enlarge. Watch closely, as the mushroom can double in size each day.
The mushroom is ready to pick when the cap is as big across as the stem is long. This is the button stage. For portabellas, leave the developing mushroom growing until the cap fully opens and gills are visible on the underside of the cap.
Harvest portabellas when the cap is fully open and the edges are still rolled down. Mushrooms grow in cycles or flushes, and a flush can occur every 7 to 14 days, depending on the temperature. Growing for portabellas increases the time between flushes.
Harvest:
To pick, gently grasp the cap and apply a little downward pressure and a slight twist. The mushroom will come loose from the soil with a bit of mycelium attached. Trim the mycelium and soil off the bottom of the stem, and discard the trimmings. Try not to disturb the area around the harvested mushroom, as others are formed and are waiting to develop.
With proper care and watering, the kit will produce for 60 to 90 days. Keeps pets away from the kit. Cats may like to dig in the soil.
We thank you for choosing our River Valley Ranch mushroom growing kit and wish you a bountiful crop. Your mushroom kit is prepared using the same materials we use on our commercial farm to produce 10,000 lbs of fresh organic mushrooms per week.
We package the materials when the mushroom mycelium is at the proper stage of development, to ensure high quality productive growing kit for you.