Farmer's markets are the place to be to get some of the freshest, most unique, and tasty vegetables, meats, and other goods including edible mushrooms of all kinds. They are also a great place to network and build community within your region among the many farmers and ranchers and the cities their work supports. Yet, over the winter a lot of these markets hibernate until spring, a few winter markets pop up here and there, but a lot of us are left with limited options to acquire farm-fresh food.
There are a lot of resources and kits available to help individuals learn to grow, and easily grow various fruits, vegetables, and often mushrooms. Mushrooms kits come in all different sizes and varieties from the common button mushrooms to more exotics such as oysters, shiitake, lions mane, and many more.
Working with Farmer Eric, from River Valley Ranch, Plantify is able to bring you Agaricus bisporus kits, otherwise known as button mushrooms. These boxes are great and allow you to grow at home edible mushrooms! Fresh mushroom compost comes straight to your door inoculated and ready to start producing button mushrooms, all you have to do is open and top with casing (included) and follow farmers' instructions to success.
Button Mushroom Kits
The Starting Point
Each box will come with two different bags of material, the larger of the two contains inoculated mushroom compost, the other contains the casing. The casing will be layered onto the inoculated mushroom compost. This casing layer encourages the fruiting of the mycelium growing in the inoculated mushroom compost.
Upon receiving a kit you should be able to squeeze the casing and a small amount of liquid should drip out, this is a good moisture level to try and keep the casting at. the best way to water is by dribbling or showering 4 ounces of water on the casing. The layer of the casing is going to supply most of the water to the growing mushrooms, so we want to keep it moist but not soaked.
Close to Pinning
It will take a few days, but eventually, when you look at the surface of the casing there will be white blotches that appear to be mold. This is good news, your closer to mushrooms.
As these first splotches appear, if you look closely you will see little white bumps forming from that growth. This is call pinning, and it’s the fruiting body forming. You are now very close to getting mushrooms.
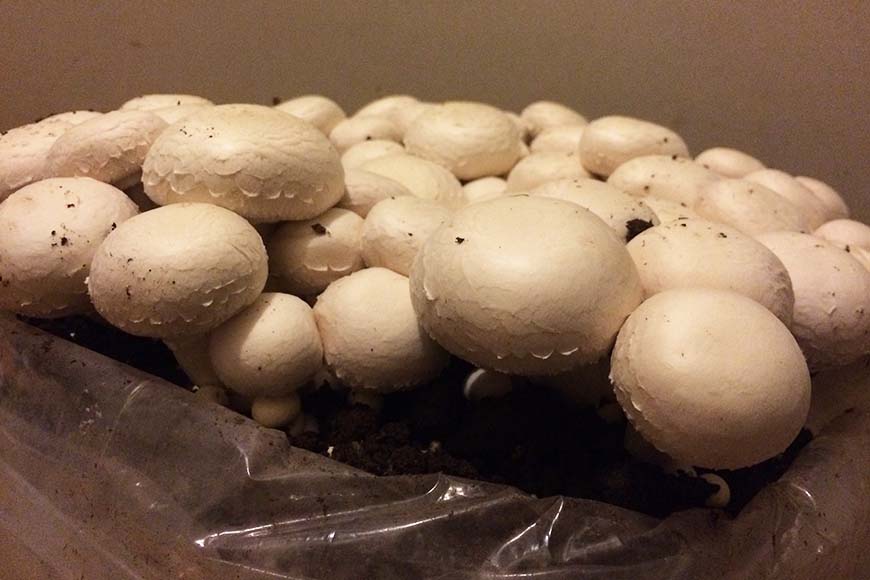
The Harvest

pictured above is a portabella
At this point, the mushroom box will start to grow pretty fast under the right conditions. You will notice that the mushrooms grow in flushes, once one batch is harvested another growth of mushrooms will appear and this process is repeated until the compost has run out of energy to produce.
After a few weeks of mushrooms producing, ranging from 30 to 60 days, you are left with a box full of compost for your garden. This left-over growing medium is an amazing compost builder and soil amendment.
What is Spent Mushroom Substrate?
The spent mushroom substrate is known to be higher in salts when they are “fresh” after mushroom harvesting. By composting or letting your spent mushroom compost sit for 16 months after your mushrooms are done growing will lower the salt content to almost zero.
Yet, I have used bags of compost straight after growing mushrooms in my garden and did not notice major changes negatively. I even found a few extra mushrooms in the garden where I spread out the compost.
Letting the spent mushroom compost age will also change the nutrient values over time. Information from the University of Penn State extension shows that the initial test of fresh SMS had an N-P-K of 1.8-0.6-2.2 and after 16 months the SMS had an N-P-K of 2.7- 0.8- 0.47.
The spent mushroom substrate is also high in calcium making it a great soil builder and fertilizer around crops such as tomatoes that take a good amount of calcium to avoid health and disease problems.
I love getting these boxes, not only do I get to cook with these tasty, but I also pickle some of my harvest of mushrooms for later use.
How I like to roast mushrooms
I like to toss fresh mushrooms picked mushrooms in some oil, salt, and pepper. Lay them across a sheet pan. Roast in the oven until cooked to desired taste. Mushrooms will sweat out a lot of water as they cook. Near the end, they will soak a large amount, if not all backup. This is when I consider them done.
I will also use them sautéed in the morning with onions and garlic for an omelet or other breakfast goodies.
Another great option is to pickle them. Or if your short on time just use this quick pickle recipe.
Quick Pickle recipe
- Pick a pound of white mushrooms from your grow bags and wash them up and dry them on a cloth towel.
- In a saucepan combine all the spices, salt, sugar, oil, and vinegar as well.
- Bring a saucepan to a boil over low to medium heat.
- Place mushrooms into the mixture stir, and continue to boil for a minute.
- Now reduce heat to low, and allow to marinate for 7 minutes.
- Once the 7 minutes is up, allow the mushrooms to soak up all the flavors for 20 to 30 minutes.
- Fill up a glass jar of choice and move to the fridge.
This recipe will store for a month or more in the fridge. These mushrooms will go great alone as a snack, chopped into salads for a burst of flavors, or my favorite speared onto a bloody mary. You can use dried dill, but if its gardening season the fresh-picked will make the quick pickle recipe pop.
Ingredients:
1 pound fresh-picked mushrooms
2 Tablespoon vinegar 9%
2 Tablespoons oil
3 cloves garlic
4-6 clove buds
8-12 coriander seeds
1teaspoon salt
2 teaspoons sugar
A few bay leaves
Dill to taste.